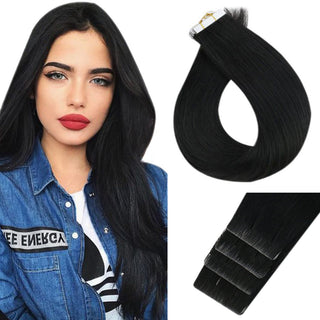
Seamless injection tape-in hair extensions are a type of tape-in extension that uses innovative injection technology for a more natural and undetectable attachment. Unlike traditional tape-in extensions, which rely on adhesive tapes, seamless injection extensions involve injecting the hair into a thin, flexible polyurethane strip. This process creates a lightweight, seamless base where the hair is evenly distributed throughout the strip. The result is a natural look with even hair distribution when applied to the scalp. This advanced injection technique eliminates the need for adhesive tapes, offering a more discreet and seamless integration with your natural hair.
-
Length: 14", 16", 18", 20", 22", 24"
-
Weight: 14"-16": 2g per piece, 5 pieces per pack (10g per pack). 18"-24": 2.5g per piece, 5 pieces per pack (12.5g per pack). Typically, 150-200 grams are needed for a full head.
-
Color: #1 Jet Black
-
Texture: Natural straight texture that develops a natural wave when wet or air-dried.
-
Lasting Time: Durable for 6-12 months with proper care.
- Tape: Equipped with high-quality white PU double-sided tape, measuring 0.8cm by 4cm. For optimal hold, replace the tape every 4-6 weeks.
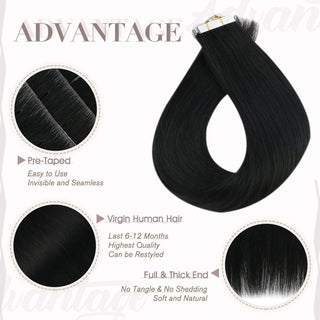
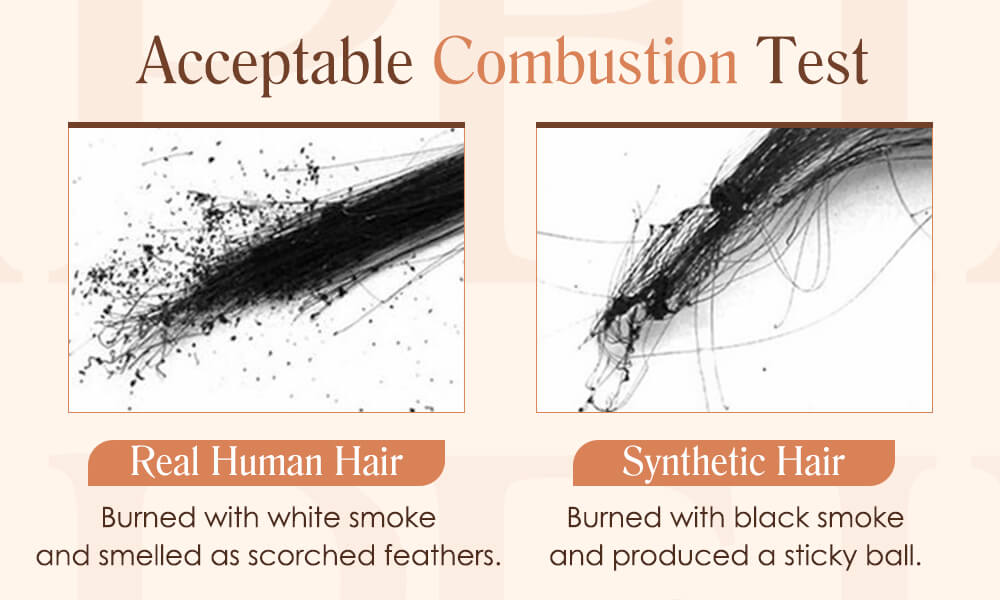
- Quality and Longevity: Virgin hair lasts longer and maintains its strength and shine better than Remy hair. It is also more resistant to washing.
- Versatile Styling: Style it like your own hair—straighten, curl, and dye (only light to dark). Avoid bleaching to maintain quality.
- Silky Straight: Provides a silky straight texture for an ultra-smooth feel.
Virgin Hair Benefits
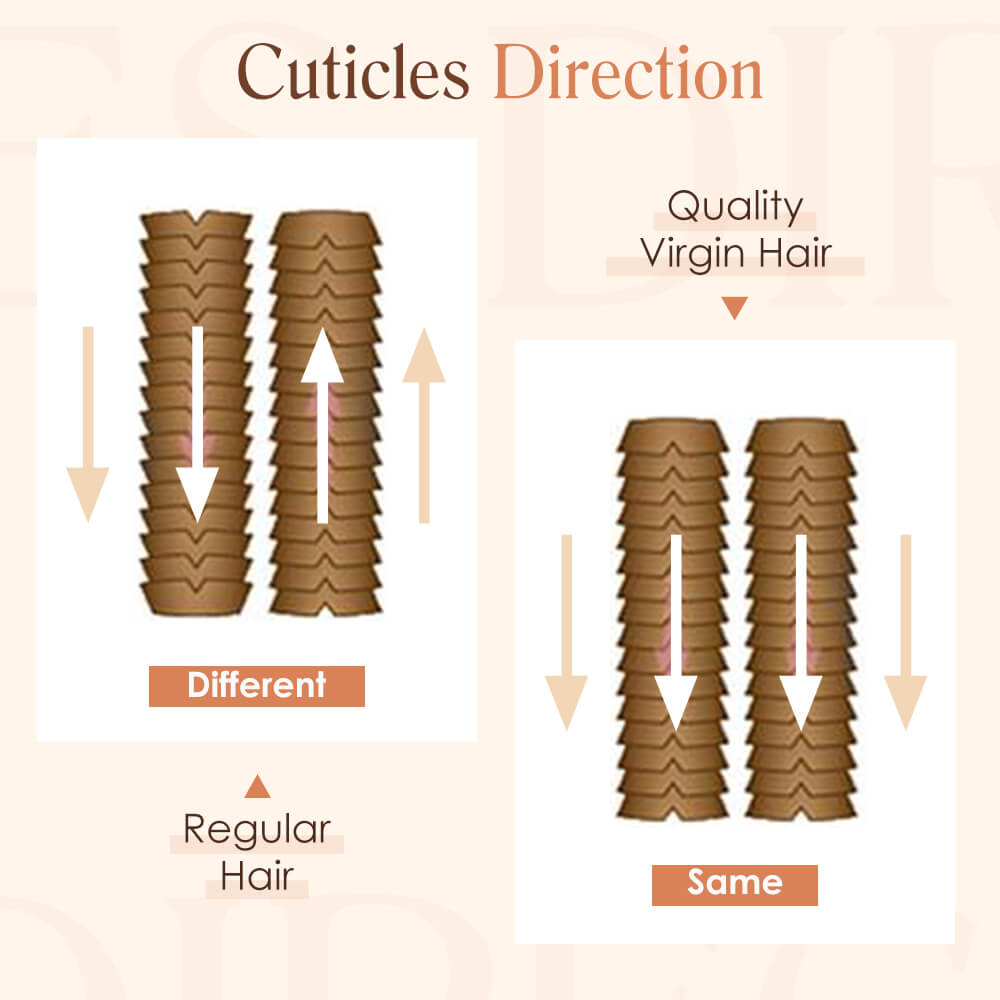
- Same Donor: Made from hair of the same donor, with intact and aligned cuticles to reduce tangling and breakage.
- Natural Look: Retains natural color and texture, offering a realistic and seamless appearance.
Seamless and Natural
- Seamless Blend: The seamless injection method ensures a perfect blend with your natural hair, without visible tapes or bulky attachments.
- Natural Flow: Hair is evenly distributed for a smooth, natural flow that mimics the movement of your real hair.
Thin, Comfortable, and Secure
- Lightweight Design: The thin, flexible polyurethane strip conforms to the shape of your head, providing a comfortable and natural fit without added weight or bulk.
- Firm and Lasting Hold: The injection process securely embeds the hair within the strip, reducing the risk of slippage or movement, allowing for long-lasting wear throughout your daily activities with confidence.
Pre-Installation Preparation
- Clean Hair Thoroughly: Start with clean, residue-free hair. Avoid using any oily or conditioning products before installation, as these can interfere with the adhesive.
- Dry Hair Completely: Ensure your hair is completely dry to maximize the adhesive’s effectiveness.
Installation Tips
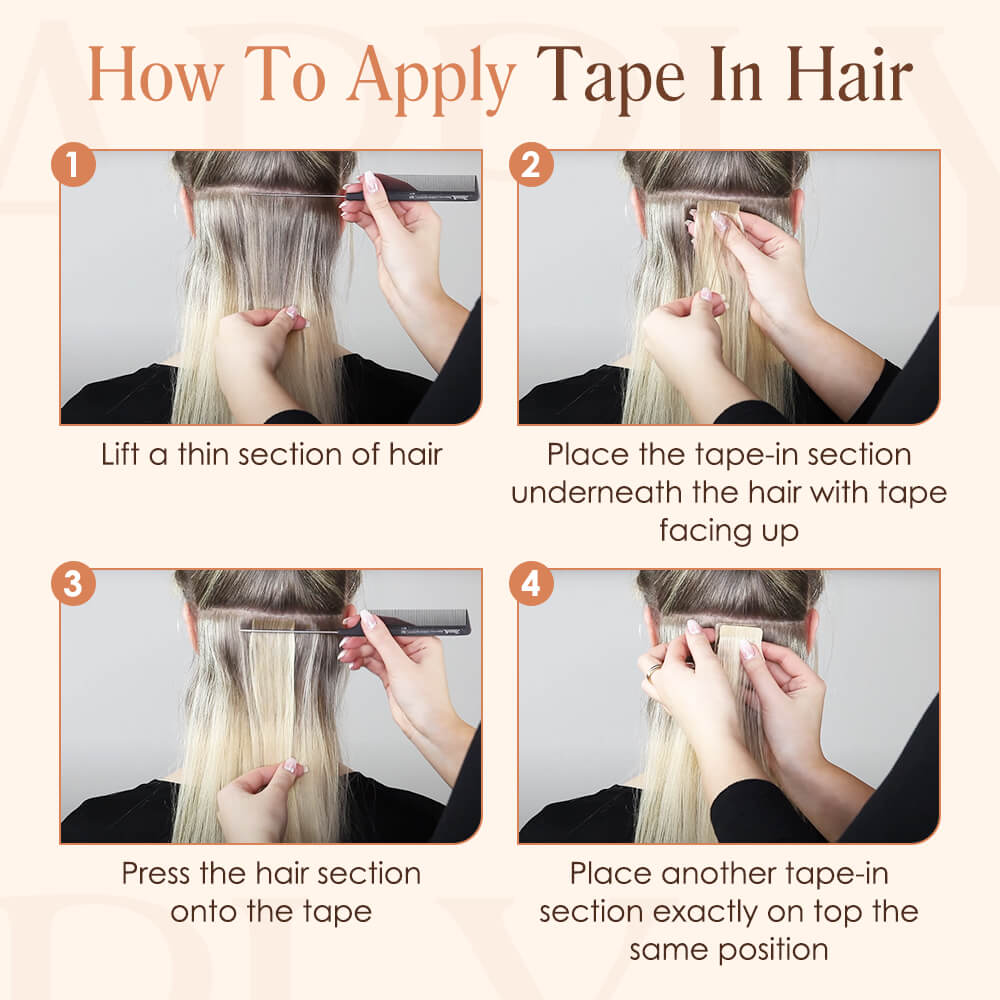
- Even Sectioning: Carefully section your hair into thin, even layers. This allows the tape extensions to adhere securely and evenly, reducing the risk of slippage.
- Avoid Scalp Contact: Place the tape extension slightly away from the scalp (1-2 millimeters) to prevent discomfort and reduce tension on the roots.
- Align Tapes Perfectly: Make sure the top and bottom tape sections align perfectly to ensure a strong bond.
Post-Installation Care
- Avoid Excessive Heat: For the first 72 hours after installation, avoid using high-heat styling tools, as they can weaken the adhesive and cause the extensions to slip.
- Minimize Touching: Try not to touch or play with the tape area frequently, as this can degrade the adhesive strength.
- Washing Guidelines: Use a sulfate-free shampoo to wash your hair, focusing on the scalp and avoiding the tape area. When conditioning, apply the product only to the mid-lengths and ends to keep the tape adhesive intact.
Ongoing Care & Maintenance
- Regular Check-ups: Every 4-6 weeks, inspect your extensions for any signs of loosening or slippage. If needed, reapply or replace the adhesive to maintain a secure hold.
- Gentle Handling: Be gentle when brushing and styling your hair. Start from the ends and work your way up to avoid pulling on the extensions.
- Nighttime Protection: Tie your hair in a loose braid or ponytail before bed to prevent tangling and reduce strain on the extensions.
Removal and Reapplication
- Professional Removal: For the safest removal, use a professional adhesive remover designed specifically for tape extensions. This helps prevent damage to your natural hair.
- Reapplication: If you plan to reuse the extensions, clean the wefts thoroughly before applying new adhesive tape.
When to Replace the Tape
- Routine Replacement: It's recommended to replace the adhesive tape every 4-6 weeks, depending on how often you wash and style your hair. This ensures the extensions remain securely attached and maintain their natural appearance.
- Signs of Wear: If you notice any slipping, reduced adhesion, or if the tape begins to lose its stickiness, it's time to replace the tape.
Steps for Replacing the Tape
-
Gently Remove the Extensions: Use a professional adhesive remover to carefully lift the tape extensions from your hair. Be patient to avoid pulling or damaging your natural hair.
-
Clean the wefts: Once the extensions are removed, thoroughly clean the wefts to remove any residue from the old adhesive. This ensures a smooth surface for the new tape. If needed, add baking soda to remove any tape residue. Avoid conditioning the roots to prevent slipping.
-
Apply the New Tape: Ensure your hands are clean and oil-free when handling the new tape. Make sure all old tape is removed from the extensions before reapplying new tape. Cut the replacement tape to the appropriate size if necessary, and carefully apply it to the cleaned weft. Press firmly to ensure the new tape adheres properly.
-
Reinstall the Extensions: Once the new tape is securely in place, you can reinstall the extensions using the same installation techniques. Be sure to position them correctly and align the tapes for a seamless look.
Yes, you can style virgin hair extensions just like your natural hair, including straightening, curling, and dyeing to darker shades. However, it is not recommended to bleach the hair, as this can compromise its quality.
The adhesive tape should be replaced every 4-6 weeks, depending on how frequently you wash and style your hair. Regular replacement ensures the extensions remain securely attached and look natural.
Store your extensions in a cool, dry place away from direct sunlight. It’s best to keep them in their original packaging or a breathable storage bag. Make sure they are clean, dry, and tangle-free before storing to maintain their quality.
In hot or humid conditions, your hair extensions may be more prone to frizz and tangling. Use anti-frizz products sparingly, avoid over-styling, and always keep your extensions moisturized. When outdoors, consider wearing a hat or using protective hairstyles to shield your extensions from the sun.
If your extensions get wet, gently blot them with a towel and allow them to air dry. Avoid rubbing or twisting the hair. After drying, detangle the extensions with a wide-tooth comb or fingers to prevent matting.
To prevent slippage, avoid applying heavy oils or conditioners near the roots where the tape is applied. If you know you’ll be in a hot environment, try to keep your scalp dry and avoid excessive sweating.
Full Shine Virgin Human Hair Seamless Injection Tape in Extensions Jet Black (#1)
- Stückpreis
- /per
Produkt in den Warenkorb legen
Seamless injection tape-in hair extensions are a type of tape-in extension that uses innovative injection technology for a more natural and undetectable attachment. Unlike traditional tape-in extensions, which rely on adhesive tapes, seamless injection extensions involve injecting the hair into a thin, flexible polyurethane strip. This process creates a lightweight, seamless base where the hair is evenly distributed throughout the strip. The result is a natural look with even hair distribution when applied to the scalp. This advanced injection technique eliminates the need for adhesive tapes, offering a more discreet and seamless integration with your natural hair.
-
Length: 14", 16", 18", 20", 22", 24"
-
Weight: 14"-16": 2g per piece, 5 pieces per pack (10g per pack). 18"-24": 2.5g per piece, 5 pieces per pack (12.5g per pack). Typically, 150-200 grams are needed for a full head.
-
Color: #1 Jet Black
-
Texture: Natural straight texture that develops a natural wave when wet or air-dried.
-
Lasting Time: Durable for 6-12 months with proper care.
- Tape: Equipped with high-quality white PU double-sided tape, measuring 0.8cm by 4cm. For optimal hold, replace the tape every 4-6 weeks.
- Quality and Longevity: Virgin hair lasts longer and maintains its strength and shine better than Remy hair. It is also more resistant to washing.
- Versatile Styling: Style it like your own hair—straighten, curl, and dye (only light to dark). Avoid bleaching to maintain quality.
- Silky Straight: Provides a silky straight texture for an ultra-smooth feel.
Virgin Hair Benefits
- Same Donor: Made from hair of the same donor, with intact and aligned cuticles to reduce tangling and breakage.
- Natural Look: Retains natural color and texture, offering a realistic and seamless appearance.
Seamless and Natural
- Seamless Blend: The seamless injection method ensures a perfect blend with your natural hair, without visible tapes or bulky attachments.
- Natural Flow: Hair is evenly distributed for a smooth, natural flow that mimics the movement of your real hair.
Thin, Comfortable, and Secure
- Lightweight Design: The thin, flexible polyurethane strip conforms to the shape of your head, providing a comfortable and natural fit without added weight or bulk.
- Firm and Lasting Hold: The injection process securely embeds the hair within the strip, reducing the risk of slippage or movement, allowing for long-lasting wear throughout your daily activities with confidence.
Pre-Installation Preparation
- Clean Hair Thoroughly: Start with clean, residue-free hair. Avoid using any oily or conditioning products before installation, as these can interfere with the adhesive.
- Dry Hair Completely: Ensure your hair is completely dry to maximize the adhesive’s effectiveness.
Installation Tips
- Even Sectioning: Carefully section your hair into thin, even layers. This allows the tape extensions to adhere securely and evenly, reducing the risk of slippage.
- Avoid Scalp Contact: Place the tape extension slightly away from the scalp (1-2 millimeters) to prevent discomfort and reduce tension on the roots.
- Align Tapes Perfectly: Make sure the top and bottom tape sections align perfectly to ensure a strong bond.
Post-Installation Care
- Avoid Excessive Heat: For the first 72 hours after installation, avoid using high-heat styling tools, as they can weaken the adhesive and cause the extensions to slip.
- Minimize Touching: Try not to touch or play with the tape area frequently, as this can degrade the adhesive strength.
- Washing Guidelines: Use a sulfate-free shampoo to wash your hair, focusing on the scalp and avoiding the tape area. When conditioning, apply the product only to the mid-lengths and ends to keep the tape adhesive intact.
Ongoing Care & Maintenance
- Regular Check-ups: Every 4-6 weeks, inspect your extensions for any signs of loosening or slippage. If needed, reapply or replace the adhesive to maintain a secure hold.
- Gentle Handling: Be gentle when brushing and styling your hair. Start from the ends and work your way up to avoid pulling on the extensions.
- Nighttime Protection: Tie your hair in a loose braid or ponytail before bed to prevent tangling and reduce strain on the extensions.
Removal and Reapplication
- Professional Removal: For the safest removal, use a professional adhesive remover designed specifically for tape extensions. This helps prevent damage to your natural hair.
- Reapplication: If you plan to reuse the extensions, clean the wefts thoroughly before applying new adhesive tape.
When to Replace the Tape
- Routine Replacement: It's recommended to replace the adhesive tape every 4-6 weeks, depending on how often you wash and style your hair. This ensures the extensions remain securely attached and maintain their natural appearance.
- Signs of Wear: If you notice any slipping, reduced adhesion, or if the tape begins to lose its stickiness, it's time to replace the tape.
Steps for Replacing the Tape
-
Gently Remove the Extensions: Use a professional adhesive remover to carefully lift the tape extensions from your hair. Be patient to avoid pulling or damaging your natural hair.
-
Clean the wefts: Once the extensions are removed, thoroughly clean the wefts to remove any residue from the old adhesive. This ensures a smooth surface for the new tape. If needed, add baking soda to remove any tape residue. Avoid conditioning the roots to prevent slipping.
-
Apply the New Tape: Ensure your hands are clean and oil-free when handling the new tape. Make sure all old tape is removed from the extensions before reapplying new tape. Cut the replacement tape to the appropriate size if necessary, and carefully apply it to the cleaned weft. Press firmly to ensure the new tape adheres properly.
-
Reinstall the Extensions: Once the new tape is securely in place, you can reinstall the extensions using the same installation techniques. Be sure to position them correctly and align the tapes for a seamless look.
Yes, you can style virgin hair extensions just like your natural hair, including straightening, curling, and dyeing to darker shades. However, it is not recommended to bleach the hair, as this can compromise its quality.
The adhesive tape should be replaced every 4-6 weeks, depending on how frequently you wash and style your hair. Regular replacement ensures the extensions remain securely attached and look natural.
Store your extensions in a cool, dry place away from direct sunlight. It’s best to keep them in their original packaging or a breathable storage bag. Make sure they are clean, dry, and tangle-free before storing to maintain their quality.
In hot or humid conditions, your hair extensions may be more prone to frizz and tangling. Use anti-frizz products sparingly, avoid over-styling, and always keep your extensions moisturized. When outdoors, consider wearing a hat or using protective hairstyles to shield your extensions from the sun.
If your extensions get wet, gently blot them with a towel and allow them to air dry. Avoid rubbing or twisting the hair. After drying, detangle the extensions with a wide-tooth comb or fingers to prevent matting.
To prevent slippage, avoid applying heavy oils or conditioners near the roots where the tape is applied. If you know you’ll be in a hot environment, try to keep your scalp dry and avoid excessive sweating.